Static linking on Mac OS X

Sometimes you want to distribute a program without requiring users to install a long chain of dependencies. Typically we can do this by building a statically linked binary; for example, by passing the -static flag when linking with gcc. Apple, however, does not support statically linked binaries, so this approach won’t work on Mac OS X. Apple does, however, support statically linked libraries. This means we can get pretty close to what we want: we’ll statically link user-space libraries into our binary, but we won’t statically link with system libraries or the kernel.

To make this approach work, we need to hide all of the user-space shared libraries during the linking phase of our build process. The Apple linker always prefers shared libraries when it can find them, but will revert to static libraries in the absence of a shared library. I’ve yet to find a command-line parameter to change this behavior, but a brute-force solution is available. Essentially, we want to rename every shared library in /usr/local such that it no longer ends in .dylib, link our program, then put all of the shared libraries back the way we found them. I wrote this Python 3 script to automate the process. To temporarily hide the shared libraries on your system, run it like this:

$ ./hide-shared-libs.py -d /usr/local --hide


To restore your shared libraries, use the following command:

$ ./hide-shared-libs.py -d /usr/local --restore


Of course, this assumes that you have static versions of all of the libraries you intend to link with. By default, not all software will install static libraries. I use Homebrew to build software on Mac OS X, and have needed to add --enable-static to the configure parameters for a few packages. Once you rebuild with this parameter, however, static linking should work as expected.
Say “Hola” to mDNS-SD in Java

Service discovery in Java is not as simple as it should be. Apple’s reference implementation, Bonjour, is ironically very difficult to setup on Mac OS X (for JavaFX at least). Alternative pure-Java implementations exist, but I’ve yet to find one that identifies services quickly, offers configurable logging, and is robust enough to tolerate the mDNS responses generated by a 3rd-generation Apple TV (seriously, this kept crashing one of the services I tried). While the system-wide service design provided by Bonjour and Avahi is ideal for reducing network traffic via caching, it also adds an additional software dependency that is outside the control of an app developer.

Enter Hola, a dead-simple, pure-Java implementation of Multicast DNS Service Discovery (mDNS-SD). Zeroconf networking promises incredible ease-of-use for end users, but to encourage adoption that simplicity should extend to developers as well. Thus, Hola has been designed with low requirements and a (hopefully!) intuitive API. Want to find every TiVo on your local network? Here’s the code to do it:

try {
    Service service = Service.fromName("_tivo-mindrpc._tcp");
    Query query = Query.createFor(service, Domain.LOCAL);
    List<Instance> instances = query.runOnce();
    instances.stream().forEach(System.out::println);
} catch (UnknownHostException e) {
    logger.error("Unknown host: ", e);
} catch (IOException e) {
    logger.error("IO error: ", e);
}

Each returned Instance will have a user-visible name, a list of IP addresses, a port number, and a set of attributes:

String userVisibleName = instance.getName();
List<InetAddress> addresses = instance.getAddresses();
int port = instance.getPort();
if (instance.hasAttribute("platform")) {
    String platform = instance.lookupAttribute("platform");
}

And that’s it. To search for different services, just change the String passed to Service.fromName(). Right now only synchronous operation is supported, but I plan to add an asynchronous listener in the next release. As for requirements, Hola depends on nothing beyond Java 8 and SLF4J.

Development is hosted on GitHub at https://github.com/fflewddur/hola and pre-compiled JARs are available. If you’re looking for Java-based service discovery, give Hola a try. As always, comments and bug reports are welcome.

QuickTuring: a fast Java implementation of the Turing stream cipher

I recently needed to use Qualcomm’s Turing stream cipher for a Java project. Some Googling found a Java port of Qualcomm’s C++ reference implementation, which behaves almost exactly as expected: its output is always correct, but its runtime is significantly slower than the C++ implementation. As in, an order of magnitude slower. If this were the late ’90s, such a performance difference between C++ and Java might be expected… but it isn’t, so it’s not.

Digging into the code revealed several areas that required sequential execution, thus preventing HotSpot’s JIT-compiler from really going to town in its optimizations. Qualcomm’s implementation, by contrast, makes liberal use of loop unrolling and bit-parallel operations. By turing as many of these sequential operations as possible into bit-parallel operations, we can help the JVM perform more operations per clock cycle and allow it to inline critical methods.

Starting with the existing Java port as a base, I ported over the bit-parallel optimizations from Qualcomm’s implementation, in the process eliminating most of the loops requiring serial execution. The results are stark: with the original Java port, VisualVM showed that decrypting a 14 GB file resulted in 38.5 seconds spent in the Turing code. By contrast, the optimized variant spent only 5.8 seconds in the same code.

Qualcomm’s license allows both source and binary modification and redistribution, provided they are credited for Turing’s development. If that license suits your needs and you need a fast Java implementation of the Turing cipher, my port is available on GitHub as QuickTuring. Comments and bug reports are welcome.

Ubuntu and Radeon video cards

The last few releases of Ubuntu have given me a lot of trouble on a desktop with a pair of Radeon 7970 video cards. The Live CD would start up, but leave me with a blank black screen and a mouse cursor. Doing a console-only install worked fine, but as soon as I’d try to install an X server, the system would go back to showing nothing more than a black screen.

Various help forums discuss enabling the “nomodeset” option during installation (it seems lots of other folks have had problems getting Ubuntu to play nice with AMD/ATI video cards). By itself, that didn’t make any difference on my system, but the idea in this thread put me on the right track. Here are the steps I used to install Ubuntu 14.04 on a system with a pair of Radeon 7970 graphics cards:

  1. When the Live DVD starts up, press the down arrow. A language selection screen should appear; use the arrow keys to select your language and press Return.
  2. Press F6. A menu will appear with advanced installation options. Check the boxes for “nomodeset” and “free software only” (use the Return key to check them).
  3. Press Escape to exit that menu and press Return to start the Live DVD.
  4. After waiting a few minutes, my system still appeared hung on a blank screen. Press ctrl-alt-F1 to get to a console.
  5. At the console, enter the command “sudo bash” to start a shell with administrative access.
  6. Type “apt-get remove xserver-xorg-video-radeon” to remove the default Radeon driver.
  7. Type “service lightdm restart” to restart the display manager. On my system, this took me to a regular desktop running from the Live DVD. From there I could install Ubuntu normally.
  8. Once the install finished and the system restarted, I went into Settings → Software & Updates and checked the box to allow “Proprietary drivers for devices”. Close that dialog to apply the new setting, then open it up again. Select the “Additional Drivers” tab and change from the open-source driver to AMD’s fglrx-updates driver. Reboot and enjoy your new Ubuntu desktop.

[Nearly] Silence your Butterfly Labs Little Single Bitcoin Miner

Last week my Butterfly Lab Little Single (SC) Bitcoin miner finally arrived. The good: it works as advertised and mines Bitcoins at about 30 GH/sec. Setup was a breeze on Windows 8; plug in the miner, install the WinUSB driver using Zadig, startup cgminer, and away it goes.

The bad: it runs with all the subtlety of a jet engine. This thing is far and away louder than the eight GPUs I used to have running full-bore minting Bitcoins. Something needed to be done.

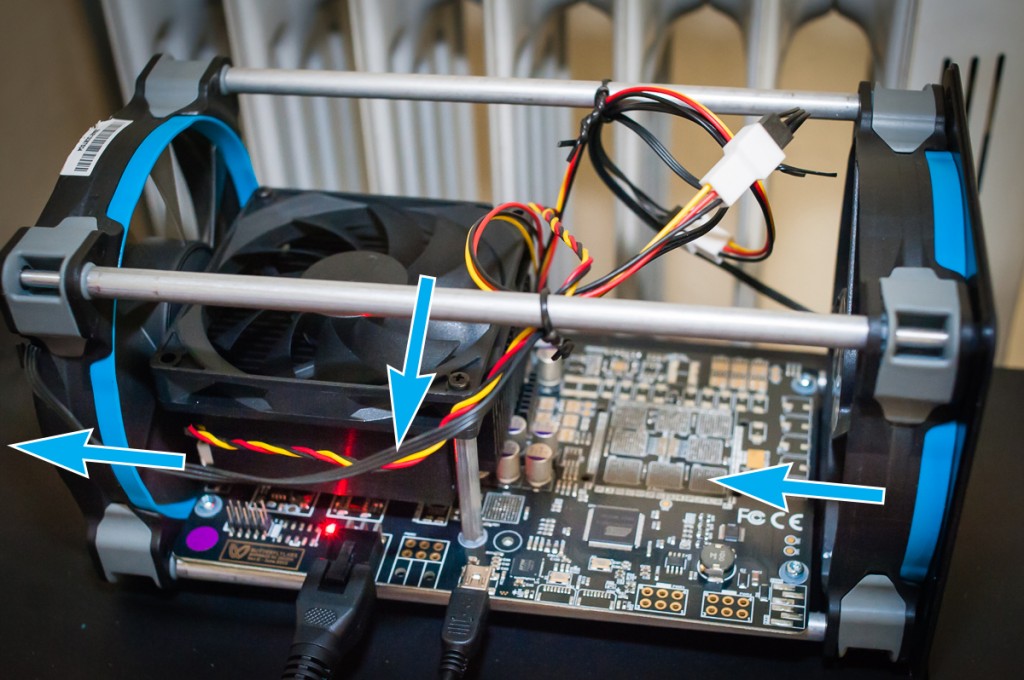
I took it apart to see if any improvements could be made. Two problems stood out: the heatsink fan was pointing in the wrong direction, and there was no air intake fan. Rummaging in the closest revealed a pair of Corsair 120mm fans and a 3-pin power splitter, so I already had all the hardware I needed. Flipping the heatsink fan around, replacing the stock exhaust fan with a quieter model, and adding an intake fan took about 10 minutes. The noise coming out of the unit is easily half of what it was; using a cheap iPhone sound meter gave a reading of 60 dB (for comparison, the same meter read 55 dB for a pair of mining GPUs).

Not only is it quieter—it’s also running cooler. Prior to this mod, it ran at about 80° C. Post-mod, it bounces between 68°–70° C. I’ve noticed that when it gets down to 68º the fans spin down further, to the point where it’s nearly silent. When the temp creeps up to 70º the fans spin back up, but still nowhere near the loudness level of the stock cooling solution.

If you want to do this yourself, here’s what you’ll need:

The steps are simple:

  1. Remove the four Torx screws from one end of the unit.
  2. Slide off the casing.
  3. Disconnect the exhaust fan from the 3-pin connector (located in the middle of the unit’s mainboard).
  4. Remove the four Torx screws from the opposite end of the unit.
  5. Remove the two Philips screws from the heatsink fan.
  6. Turn the heatsink fan upside and screw it back onto the heatsink. This fan should be blowing air down onto the heatsink; BFL installed it so that it draws air up and away from the heatsink. (An easy way to test the direction a fan is blowing is to hold a piece of tissue paper over it while it’s running.)
  7. Install one of the 120mm fans as an exhaust fan next to the heatsink (replacing the fan BFL supplied). This should be blowing hot air out of the unit.
  8. Install the other 120mm fan as an intake fan on the other side of the unit (BFL didn’t include a fan here on my unit). This should be drawing cold air into the unit.
  9. Use the 3-pin Y-splitter to connect both fans to the single 3-pin fan connector on the mainboard.
  10. Slide the case back on and screw the end-caps back in place using the Torx screws.

Here’s a photo showing what it should look like (with the case removed). The blue arrows indicate the direction of airflow for each fan.

Improved airflow on the BFL Little Single.

Improved airflow on the BFL Little Single.

It’s not completely silent, but it’s quiet enough for me to run 24/7 now. Thanks to Butterfly Labs for providing excellent Bitcoin mining hardware; I just wish they’d had put a bit more thought into the unit’s airflow. Thankfully, that’s easy to fix on our own.

Cygwin and the Case of the Unreadable Blues

Cygwin includes some nice built-in aliases for colorizing terminal output, but the default blue hue is so dark as to be unreadable on the black background. It’s easy to fix, though; just add the following Blue and BoldBlue lines to your ~/.minttyrc file:

Blue=64,64,255
BoldBlue=127,127,255

These lines will use a lighter shade of blue than the default, so you’ll be able to read it in a less-than-pitch-dark room. As an example, here’s my complete ~/.minttyrc file:

BoldAsFont=no
Transparency=high
Font=Consolas
FontHeight=10
ClicksTargetApp=no
Columns=120
Rows=52
ScrollbackLines=100000
Term=xterm-256color
Blue=64,64,255
BoldBlue=127,127,255

iCloud and Outlook: Installation Order Matters!

Nice work, nVidia. Today marks the third time in three years I’ve had to send my Mac back to Apple to replace one of your faulty GPUs. What the hell happened?

I spent the morning setting up an old Windows box so I can at least keep up on e-mail while my Mac gets a less-broken logic board. Figured this would be a good chance to checkout iCloud on Windows, so I downloaded it, installed it, and then installed Outlook 2010. Went into the iCloud control panel, told it to synchronize my Outlook Contacts, and… no. Got this useful error instead:

Error: 0x8004010F: ZebraMapiCopySession::CreateMobileMeMessageStore: CreateMessageService failed

What the hell does that mean? Turns out, it means that you shouldn’t install Outlook after iCloud; you need to install Microsoft Office first. Uninstalling and then re-installing iCloud fixed the problem. Now I’ve got my calendar, contacts, and e-mail all showing up nicely in Outlook. Which would be awesome, except—it’s still Outlook.

And Apple? Your error messages could use some work…

Apple TV and iTunes Match

My 3rd generation Apple TV (with iOS 5) has some problems streaming media. First noticed it with NetFlix; the stream would pause for about 30 seconds every couple of minutes. iTunes Match had a different problem; after playing about 10 minutes of music, the screen would go blank (my TV started searching for different inputs, so I think the Apple TV’s output signal completely died), then return to the Apple TV home screen. I haven’t had any problems using NetFlix or iTunes Match on my computer, so I assumed the wifi (an Airport Extreme) and Internet connection weren’t to blame.

Finally seem to have tracked down the problem (or at least, one of them): it’s something in the Dolby Digital output. Go into Settings/Audio & Video/Dolby Digital and change the value to Off. I have my Apple TV hooked up to a receiver via an optical cable, so I’d turned this setting on to get surround sound. Since disabling, I’ve been able to listen to entire albums on iTunes Match for the first time—they had never made it past the 10 minute mark before. Here’s hoping a software update will fix this issue and restore the surround sound feature…

Update: Spoke too soon—just dropped the audio stream again, though it’s definitely not happening as consistently as before. *sigh*.

iOS 5.1 disabled iMessage

Not sure if anyone else has had this problem, but it looks like yesterday’s iOS 5.1 update turned off iMessage support, at least on my AT&T iPhone 4. A quick trip to Settings→Messages→iMessage was all that it took to get iMessages working again (they had somehow been turned off during the update).

Anyway, just posting in case someone else is trying to figure out why their iPhone suddenly stopped receiving iMessages.

Yet Another WordPress Flash Uploader Problem (with solution!)

This was a new one for me. Every time I tried to upload a photo to a WordPress site, I received a very informative “HTTP Error” message while the upload progress bar read “Crunching…”. Thanks in part to the stunningly generic error message, it took a while to figure out exactly what was going on.  The problem, it turns out, was HTTP authentication; I had enabled Apache’s basic HTTP login for the site, but being a plugin, Adobe Flash was not similarly authenticated.  So, trying to use the Flash-based image uploader kept silently failing because it couldn’t authenticate with the server.  The fix is simple: just tell Apache not to use authentication for the script that handles Flash-based uploads.  You can do this by modifying the .htaccess file in the root of your WordPress directory like so:

<FilesMatch "(async-upload.php)$">
    Satisfy Any
    Order allow,deny
    Allow from all
    Deny from none
</FilesMatch>