Last week my Butterfly Lab Little Single (SC) Bitcoin miner finally arrived. The good: it works as advertised and mines Bitcoins at about 30 GH/sec. Setup was a breeze on Windows 8; plug in the miner, install the WinUSB driver using Zadig, startup cgminer, and away it goes.
The bad: it runs with all the subtlety of a jet engine. This thing is far and away louder than the eight GPUs I used to have running full-bore minting Bitcoins. Something needed to be done.
I took it apart to see if any improvements could be made. Two problems stood out: the heatsink fan was pointing in the wrong direction, and there was no air intake fan. Rummaging in the closest revealed a pair of Corsair 120mm fans and a 3-pin power splitter, so I already had all the hardware I needed. Flipping the heatsink fan around, replacing the stock exhaust fan with a quieter model, and adding an intake fan took about 10 minutes. The noise coming out of the unit is easily half of what it was; using a cheap iPhone sound meter gave a reading of 60 dB (for comparison, the same meter read 55 dB for a pair of mining GPUs).
Not only is it quieter—it’s also running cooler. Prior to this mod, it ran at about 80° C. Post-mod, it bounces between 68°–70° C. I’ve noticed that when it gets down to 68º the fans spin down further, to the point where it’s nearly silent. When the temp creeps up to 70º the fans spin back up, but still nowhere near the loudness level of the stock cooling solution.
If you want to do this yourself, here’s what you’ll need:
- A Torx T10 driver to remove the case (e.g., General Tools 751016 Extend A Drive 16-piece Screwdriver Set, which also includes the right sized Philips screwdriver head to remove the heatsink fan)
- Corsair Air Series SP120 High Performance Edition fan twin-pack (I used stock Corsair fans from an old computer case, I think they sit somewhere between the High Performance edition and the Quiet edition models in terms of both airflow and noise level).
- 3 Pin to 2 x 3 Pin Computer Case Fan Y-Splitter Power Connector Adapter Cable
The steps are simple:
- Remove the four Torx screws from one end of the unit.
- Slide off the casing.
- Disconnect the exhaust fan from the 3-pin connector (located in the middle of the unit’s mainboard).
- Remove the four Torx screws from the opposite end of the unit.
- Remove the two Philips screws from the heatsink fan.
- Turn the heatsink fan upside and screw it back onto the heatsink. This fan should be blowing air down onto the heatsink; BFL installed it so that it draws air up and away from the heatsink. (An easy way to test the direction a fan is blowing is to hold a piece of tissue paper over it while it’s running.)
- Install one of the 120mm fans as an exhaust fan next to the heatsink (replacing the fan BFL supplied). This should be blowing hot air out of the unit.
- Install the other 120mm fan as an intake fan on the other side of the unit (BFL didn’t include a fan here on my unit). This should be drawing cold air into the unit.
- Use the 3-pin Y-splitter to connect both fans to the single 3-pin fan connector on the mainboard.
- Slide the case back on and screw the end-caps back in place using the Torx screws.
Here’s a photo showing what it should look like (with the case removed). The blue arrows indicate the direction of airflow for each fan.
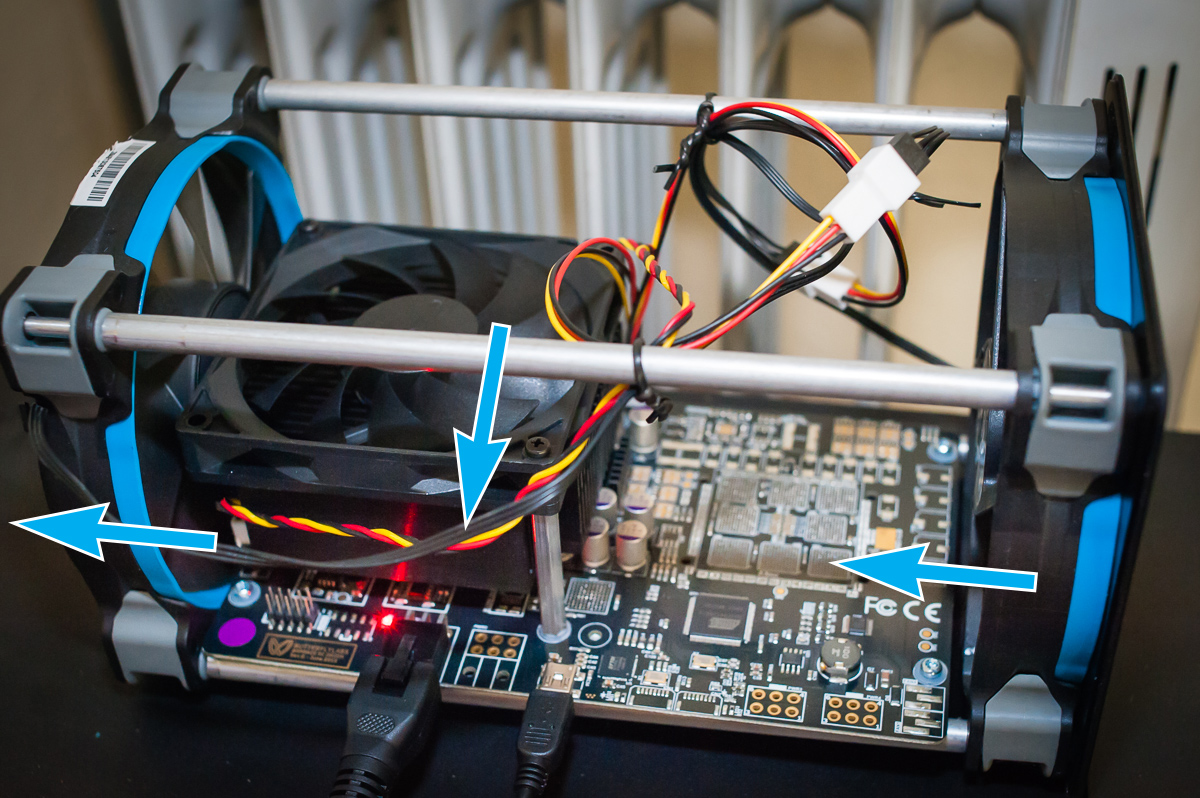
Improved airflow on the BFL Little Single.
It’s not completely silent, but it’s quiet enough for me to run 24/7 now. Thanks to Butterfly Labs for providing excellent Bitcoin mining hardware; I just wish they’d had put a bit more thought into the unit’s airflow. Thankfully, that’s easy to fix on our own.